Friday, April 5, 2013

Mixed Media hoops

I have been very quiet with my creating these days. I was lucky enough to be introduced into the world of mixed media, thank you!
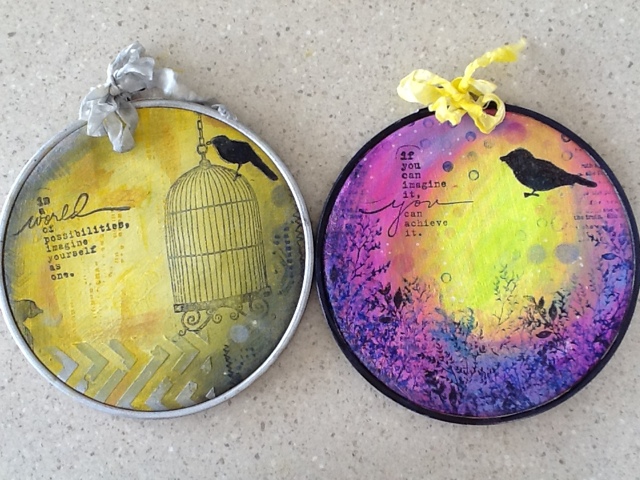
I have really enjoyed being able to use all sorts of different products to create. I am a die hard Faber Castell lover!!!!! I am playing with my new big brush pens and my gelatos. I saw the little project sheet with different hoops made using these products and thought I need to give it a try......
I am really happy with them. My favourite would be the yellow, grey and white. I used the new tropical set for the pink one and the 50s diner for the other (and white) a combination of gelatos and big brush pens and stamps by Unity.
I will post a tutorial shortly


Wednesday, January 2, 2013

Card Class

Here are a couple more cards which I will be teaching at the LSS here in Townsville. I am using the Glitz Design Papers and the flowers are made with punches, Lindys Starburst Spray and some Viva Inka-gold.

Monday, December 10, 2012

Christmas Cards 2012

It's a miracle ......yes I have finally made some homemade Christmas Cards this year. I used the wonderful Tim Holtz Sizzix Poinsettia die! It is great.
The base card was basic Kraft cardstock, a raised embossed piece of the cardstock (the dots), some Tim Holtz metal Christmas charms and the poinsettia punch is die cut twice to give it some volume. I stamped the leaves with a matching distress stain and used a studio 490 Xmas stamp on the red portion of the flower. I them placed a small amount of glossy accent into the centre and covered it with beads.

Wednesday, November 14, 2012

More projects to share

I am teaching again this week. I created some cards using Tim Holtz techniques. It has been great playing around with all things Tim! And the other picture is a shadow box I made into a Christmas display

Sunday, October 7, 2012

Update

It's a long time between posts! I have a few projects to share with you. So quick and easy cards for teaching at he shop.


Some more cards which I am teaching this week, using Tim Holtz distress inks, stamps and stain.


And this is Kaisercraft Camera album. And I am teaching this at our local scrap shop later this month. I have used photos from our recent trip to France and England


Posted using BlogPress from my iPad

Tuesday, July 17, 2012

New Project


Hi everyone, after a crazy few weeks of CHA Summer projects I have made another project to share with you all. I am teaching this Class at the local scrapbook Shop, A Craft Affair at the end of the month. These are some of the images


Monday, June 11, 2012

New Blog Design

I love my new look design. A big thanks to Tenille. I love it!i wanted to share another project I created for the last CHA for Maya Road.

Sunday, May 27, 2012

Maya Road & Paper Crafters Library Giveaway

Here's all the details so please check check backMaya Road & Paper Crafter's Library Giveaways!We are about to kick off a great week this week pairing with Paper Crafter's Library. This time we decided to do something different, so we created a fun challenge for the designers. Each designer was sent the same ten items:Love hangersmini triangle banner canvas pieceskraft mini tagsSlushie Blue twine Mini gingham trim - coffee brownZipper trim - leafRuffle Blossoms - turqoise and yellowJonathan chipboard alphabetOrnate
Vintage Butterflies stampVintage Lace Mums - AppleAnd were given the following rules:You must use all 10 Maya Road productsYou can make a layout, 3 cards, or a minibookYou cannot use any other Maya Road productsAren't you excited to see what the designers created?And, for even more fun, we will be giving this awesome Maya Road prize to one lucky winner!
The winner will recieve 5 rolls of twine (new colors!!) plus 8 wooden spools!In order to enter yourself in the giveaway you can do one of the following three things:Head over to the Maya Road Facebook fan page and what your favorite project you've seen on the blog this month was and make sure you've hit "Like" to become a fan."Like" and leave a comment on PaperCrafter's Library Facebook fan page tell them Maya Road sent you.

Wednesday, May 23, 2012

Catch up

well it certainly has been a LONG time between posts! I have heaps of new projects to share with you all.

Thursday, June 2, 2011

lots to show you

Sorry its been awhile am flat out here is my Creative Block Project


and of course this long weekend I am teaching at The Scrapbook and Papercraft Convention

I am back In Townsville at the moment

at the end of the month I will be going to Hughenden to work at their outback event teaching 5 Classes


Friday, April 8, 2011

Another Project for Helmar!

I know its been a while......BUT............I have been busy creating for some events coming up soon.
My latest past for the Helmar Design Team is up

All the details and how to is on the blog and here are a few photos of the latest:


Friday, March 4, 2011

Flower Love

Well I was lucky enough to get to attend CHA this year! I worked at the Maya Road Booth and wanted to share this amazing EASY flower in 10 minutes. Using the Helmar 450 Quick Dry Adhesive


Firstly a big thanks to Maya Road and the the lovely Lisa Pace for standing all day and making these for the make and takes.

Items needed are as follows:


1. Helmar 450 Quick Dry Adhesive

2. Pearls or embellishment for centre accent

3. small piece of Chipboard

4. Pleated Ribbon. This is Maya Road Pleated Satin Trim around 12-15inches(depending on the fullness you want)

5. A pin if you want to make a brooch


First cut the ribbon as per above, makes the flower fuller.


Apply the Helmar 450 Quick Dry Adhesive to chipboard


Start winding the ribbon from the outside.


Add more Helmar 450 Quick Dry Adhesive as you go around.


When you have finished with the ribbon it should look like this.


I finished the centre of mine with pearls. I added more Helmar 450 Quick Dry Adhesive then put the pearls on. And if you wish to make brooches you can add a pin to the back.


Thats it from me

Sarah Moore

Saturday, February 19, 2011

New Project for Maya Road DT Blog

This is my name tag I had to make up for CHA. Each CHA every Design Team member makes up a name tag to display on the dress form. Maya Road Facebook Page
You can see my post on the Maya Road Design Team Blog

Here is my tag I made up:


Tuesday, January 25, 2011

I am on my way to CHA Winter

I am super excited but not ready....tomorrow I leave for CHA Winter and you will find me in the Maya Road Booth!
Here is a preview of 2 of my projects!


Tuesday, January 18, 2011

Hi everyone. Today I am sharing a gift for a loved one.....a twist on flowers!

All the details are on the Helmar Blog if you wish to make this item! Thanks for looking!